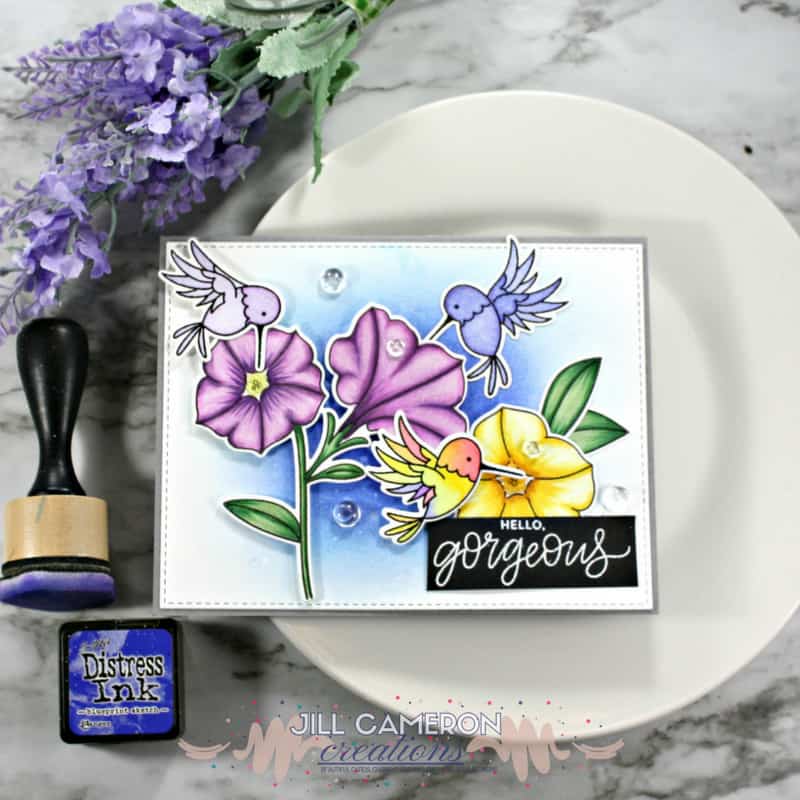
Today we are combining two mediums for one beautiful card! Watercolor hummingbirds and Copic flowers. Don’t think for a single second that you must use the same coloring medium for a card because you don’t! It’s your card so have fun with it. When I first opened this stamp set (we’ll talk more about the specifics in a moment) I knew I wanted to watercolor the hummingbirds. The flowers? Well, let’s just say my watercolor abilities aren’t all that wonderful but my Copic coloring isn’t bad. Easy solution! Combine the two mediums and BAM…beautiful card!
Links to the products used are below. Some links are affiliate links which means I get a small commission from your purchase at no additional cost to you. This is how I pay for my stamps, inks, and tools for content on my website. Full disclosure here. Thank you for your support.
Materials List
Pretty Pink Posh Hummingbird Thanks Stamp Set
Pretty Pink Post Hummingbird Thanks Coordinating Dies
Pretty Pink Posh Pretty Petunias Stamp Set
Pretty Pink Posh Pretty Petunias Coordinating Dies
Ranger Ink – Perfect Pearls – Pigment Powder – Confetti White
Ranger Ink – Glossy Accents – Clear Dimensional Embellishment – 2 ounces
Ranger Ink – Tim Holtz – Distress Ink Pads – Mini – Blueprint Sketch
Tonic Studios – Nuvo Collection – Jewel Drops – Limoncello
V01 – Copic Sketch Markers
V04 – Copic Sketch Markers
V06 – Copic Sketch Markers
V09 – Copic Sketch Markers
Y00 – Copic Sketch Markers
Y13 – Copic Sketch Markers
Y15 – Copic Sketch Markers
Y17 – Copic Sketch Markers
YR14- Copic Sketch Markers
G21 – Copic Sketch Markers
G24 – Copic Sketch Markers
G28 – Copic Sketch Markers
Kuretake – Gansai Tambi – Traditional Solid Watercolours – 36 Piece Set
For my list of always used products click here.
Watercolor Hummingbirds
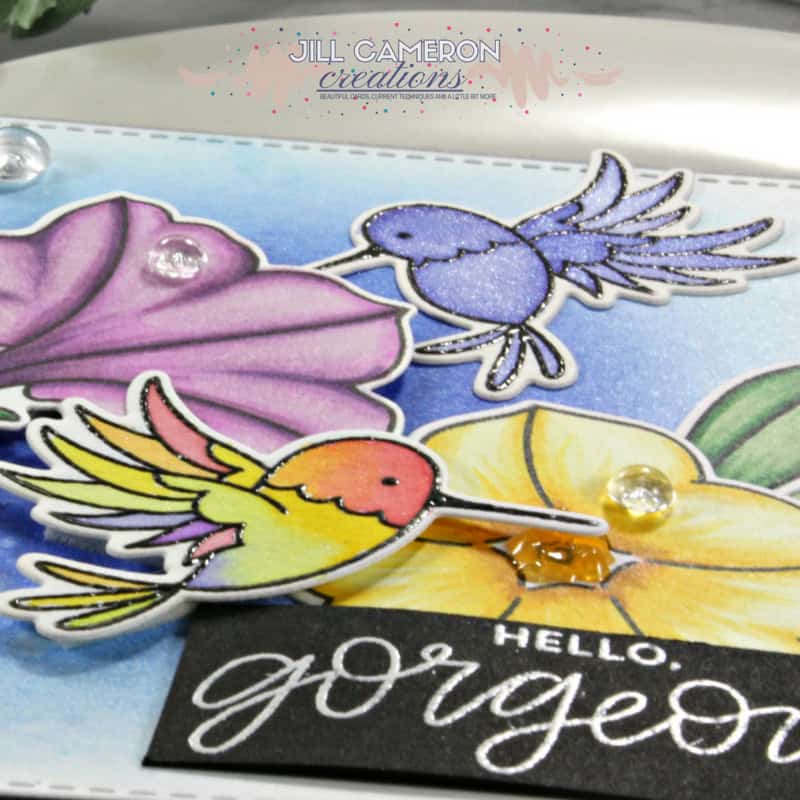
The watercolor hummingbirds had to have a little sparkle. I mean hummingbirds are so colorful and so quick they look like streaks of silver in the sky. To accomplish the sparkly look I wanted, I mixed Perfect Pearls in the color Perfect Pearls in a little container of clean water. Be sure to keep this water clean. These birds aren’t very big so you don’t need much water and a little dab of Perfect Pearls goes a VERY long way.
The very first thing you want to do before you stamp an image is to treat your watercolor paper with an antistatic powder tool. Stamp each bird in Versafine Onyx Black ink. This pigment ink gives crisp, dark black images. Add some clear embossing powder and heat set until all of the embossing powder is melted.
Next, watercolor your hummingbirds. Use whatever colors you want to use and any method you want to use. Before you die cut the hummingbirds out using the coordinating dies be 100% positive the paper is dry. If the paper isn’t dry, the paper won’t cut and could tear.
Copic Flowers
Switch to Neenah Solar White 80lb cardstock for your flowers. Stamp each flower in a Copic safe ink like My Favorite Things Extreme Black or Lawn Fawn Jet Black ink. The colors I used for the flowers are listed above in the materials list section.
Don’t stress about coloring with Copics. They take practice. Stamp a few flowers and color all of them then use your favorite. Remember, when you color with Copics to finish the coloring before you judge it. Also, let it dry before you judge it.
After the coloring is completed, go ahead and die each of the flowers.
I’m not going to go into depth about Copic coloring here but I do go into detail on this post. You can also check out Sandy Allnock, Kelly Latevelo, or The Daily Marker for more information about Copic coloring.
Put It Together
I went a little non-traditional for this card by using a lite gray A2 card base. Then, I die cut a panel of Neenah Solar White Cardstock using a stitched rectangle die. I used Distress Ink in Blueprint Sketch to create a nice blue background on the panel. I adhered one flower, one leaf, and one hummingbird flat down to the panel. Next, I used foam tape to pop up the largest flower and the remaining hummingbirds. I added the sentiment on some black cardstock with white heat embossing.
The finishing touches: moonstones and Jewel Drops in Lemoncello.
I hope you enjoyed this mixed media card. Mixing mediums on a card isn’t difficult or incorrect. It’s your card; so make it your own. These watercolor hummingbirds and Copic flowers were just beautiful together. I hope you give this try sometime and be sure to share it on social media!
See more Copic Coloring:
Departure Part I – My Favorite Things Best of Luck
Beach Bum Card
Mixing Different Brands to Create a Card