
Mother’s day is just around the corner so I want to share with you an easy Copic flower Mother’s Day card with you. This card is a breeze to replicate so you can send them to all of your mom friends too! Now I know when I say Copic markers, some of you may freeze and say “Nope, too complicated for me!” Let me assure you, Copic markers are not scary AND you don’t even have to use Copic markers to create this card. At the end, I’ll share with you some other ways you can create this easy Copic flower Mother’s Day card.

This post contains affiliate links for your convenience. This means if you make a purchase after clicking a link, I will get a small commission with no additional cost to you as the consumer. I participate in the Amazon Services LLC Associates Program, an affiliate advertising program designed to provide a means for sites to earn advertising fees by advertising and linking to Amazon.com. For full disclosure policy click here.
Easy Copic Flower Mother’s Day Card
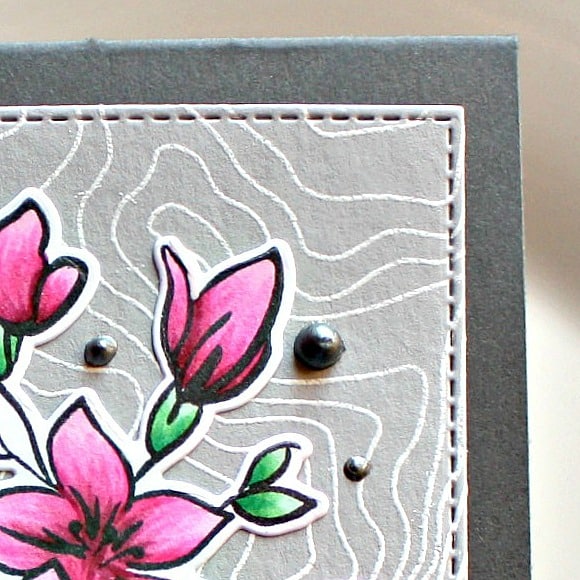
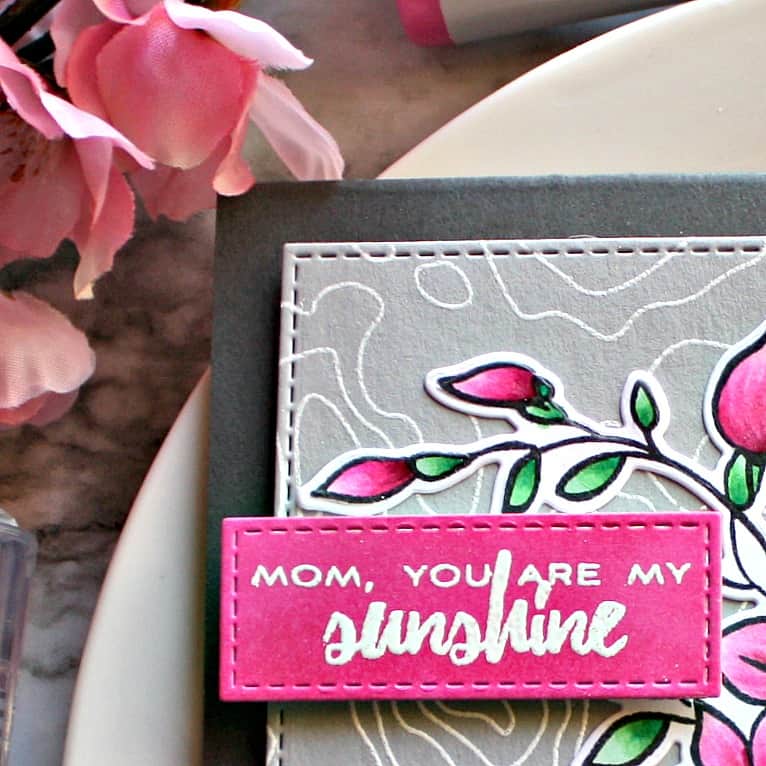
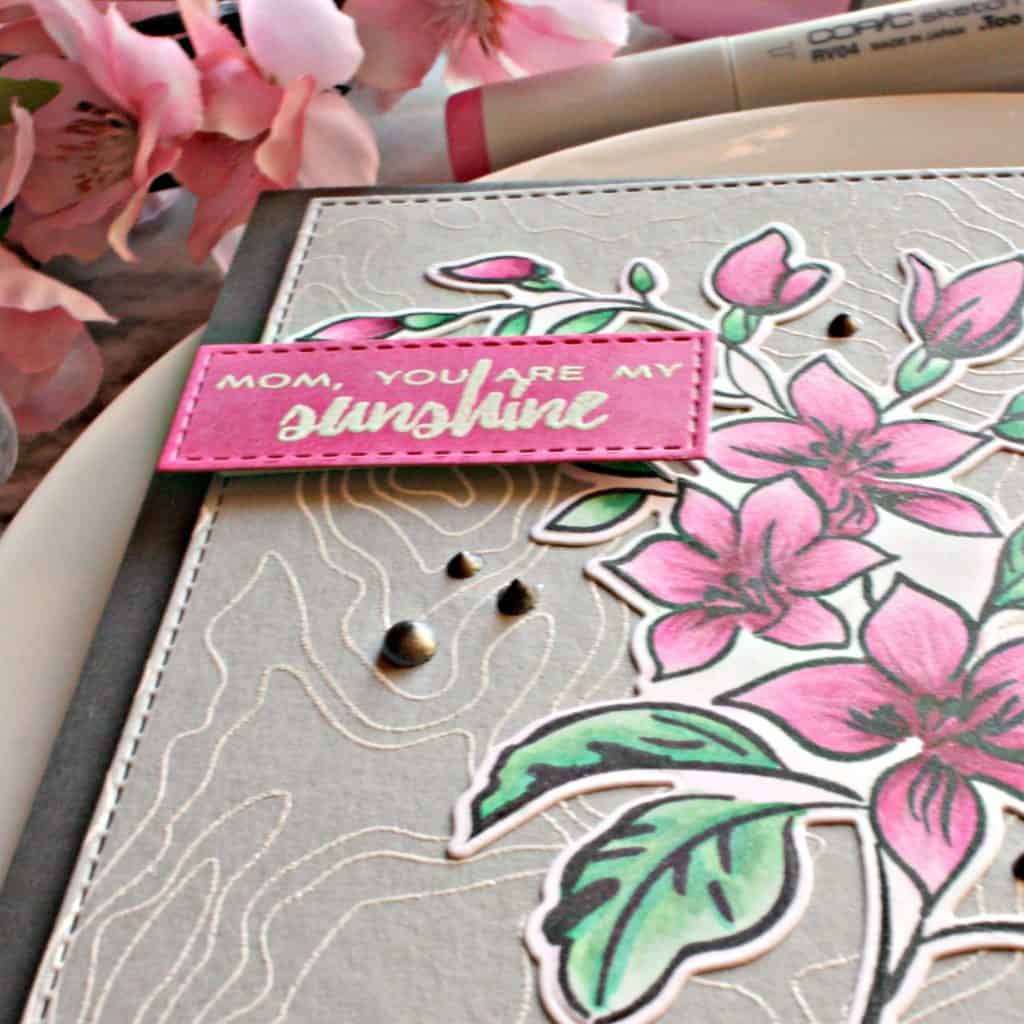
First off what makes this card so eye-catching is the use of a different color pallet: two shades of gray and a vibrant pink. The darkest gray is the card base. When the card is all finished, cut down an additional light gray or white cardstock panel to place on the inside of the card OR use a white gel pen to write your message.
Easy Copic Flower
The flowers and sentiment are from the Altenew Best Mom set. I stamped the flower image in My Favorite Things Extreme Black ink on a panel of Neenah Solar White 80 lb cardstock. This ink is super duper dark and PERFECT for Copic coloring. Since I colored this image straight away, I did heat set it to be sure it wouldn’t smear.
Over the last year, I’ve been taking Copic coloring classes and one thing I’ve learned is the more markers the easier the blend. I used six different pink colors for the flowers. Yes, you read that correctly, six.
Save yourself some ink and start with your darkest color. If it gets too light you can always go back and add more of the darkest color. Color in the areas of the flowers that would be the darkest like the centers of the flowers, where the petals overlap, and the base of the buds. Just use little lines of color with the tip of your marker. Add some tiny little flicks of color out into the flower petals.
This is not about perfection. Remember that! Believe it or not, Copics are very forgiving.
Move through all of your colors doing the same thing until you reach the lightest color. For this flower, I didn’t go back over the previous color much because I wanted to see the texture of the flicks of color and the varied colors. If you want a more blended look, color over the entire flower with your lightest color then go back in with your darkest color to put back in shadows you might have lost.
After the flowers are dry, use the coordinating die to cut out the flowers. If there are any places that you may have gone outside the lines a little bit, just use a white gel pen to touch it up. You’ll never know there was a mistake.
The Background
The background of this card uses the Topography stamp set by Neat & Tangled. Start with a 4 1/4” x 5 1/2” panel of light gray cardstock. I used my MISTI just in case I needed to stamp the image twice. With large stamps like this, it’s easy to miss a spot. Treat the cardstock panel with an anti-static powder tool before you stamp the background image with Veramark ink. I used bright white embossing powder and heat set it. I bet silver embossing powder would look pretty on this too!
Next, I cut down the light gray panel using the My Favorite Things Stitched Rectangle STAX Die-namics. I have both sets of the A2 size dies and HIGHLY recommend them. These dies provide a finished look to almost all of my card projects.
The Sentiment
The sentiments included in the Altenew Best Mom set are perfect for Mother’s Day cards. When my Mom has a rough day, I sing “You are my sunshine” in a really high squeaky voice and it makes her laugh so that sentiment was PERFECTION.
I made my own matching color paper for the sentiment by coloring it with my mid-tone Copic marker. Then, I use my anti-static powder tool, inked up the stamp in Versamark ink, and coated it with white embossing powder. I heat set the embossing powder until nice and smooth.
The smallest die in the My Favorite Things Stitched Rectangle STAX Die-namics is just the right size to trim down this particular sentiment and give it that finished look.
Assembly
Craft foam is your friend! A little bit goes a long way and it is inexpensive. I cut down sheets of white craft foam to fit behind cardstock panels. You can use liquid glue or tape runner to adhere it to the panel. I have better luck with glue.
Next, I used liquid glue on the die cut of the flower to adhere it flat to the light gray panel.
Then I used some small pieces of craft foam behind the sentiment to pop it up.
The last thing is to add some embellishments. Wink of Stella or Nuvo Aqua Shimmer Pens are pretty much the same thing; glitter suspended in liquid. I painted the glitter on each flower. Be sure to wipe off the tip of the brush since it will pick up some of the colors. And I added Nuvo Drops in Liquid Mercury.
Alternate to Copic
If you don’t have Copic markers (or any alcohol based markers), you can get similar results using a water-based marker such as Tombow on Bristol Smooth paper. The paper has a little bit of a finish on it that allows the marker to stay wetter long enough to blend. Now, mind you it doesn’t stay that wet for that long. But if you worked quickly on one flower or leaf at a time you should get similar results.
Thank you for joining me today for this easy Copic flower Mother’s Day card. Don’t let Copic markers scare you! As with anything new, it just takes some practice to get good with it. This easy Copic flower would be a great place to start!
Products Used
White Embossing Powder
MFT Stamps Cardstock – Steel Grey, Steel Blue
Altenew Best Mom Stamp Set & Die Set
MFT Die-namics A2 Stitched Rectangle STAX Set 1 & Set 2
Neat & Tangled Topography Stamp Set
Nuvo Crystal Drops – Liquid Mercury
Aqua Shimmer Pens
Lawn Fawn Jet Black
Copic Sketch Markers – G07, G14, G12, G19, RV02, RV04, RV06, RV09, RV19, RV69
Spellbinders Platinum Die Cutting & Embossing Machine
Versamark Ink
Heat Tool
Anti-Static Powder Tool
See more Copic Coloring:
White Space in Card Creation
Frightfully Sweet One Layer Card
Copic Coloring with Concord and 9th
2 Comments
Comments are closed.