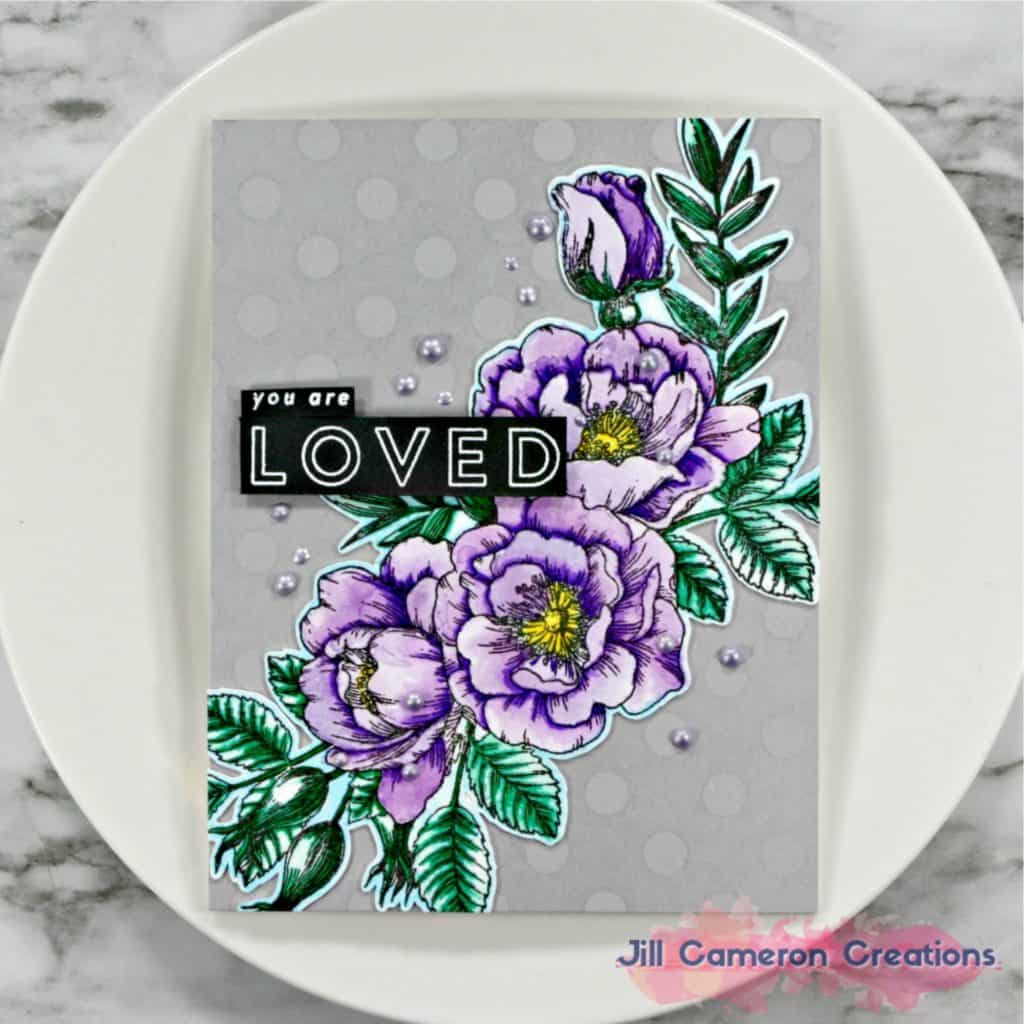
Simon Says Stamp released the Beautiful Flowers stamp set not long ago. The main floral image is HUGE and truly is beautiful! I decided I wanted watercolor flowers. Now, watercolor flowers are not my strong suit at all. I’m not an expert in watercolor but I think it’s important to step outside of my comfort zone and experience different coloring methods. Don’t get me wrong, I’ve watercolored before, but usually, it’s a just a background or something simple like that. This is the first time I sat down and really thought about watercolor flowers.
I also had to figure out how on earth I was going to get this ginormous stamped image on the front of a card since this stamp set doesn’t have a coordinating die. The thought of just watercolor paper on the front of my card didn’t thrill me much. I created a short tutorial on how I solved my lack of die cut issue and it’s at the bottom of this post. But let’s take a look at this card and see how it all came together!
Links to the products used are below. Some links are affiliate links which means I get a small commission from your purchase at no additional cost to you. This is how I pay for my stamps, inks, and tools for content on my website. Full disclosure here. Thank you for your support.
PRODUCTS USED
- Tim Holtz Watercolor Paper
- Water Brush
- Hard Board
- Blue Painter’s Tape
- Zig Real Brush Markers – Green, Yellow, Violet, Light Blue, Lilac
- Nuvo Crystal Drops – Wisteria Purple
- Beautiful Flowers Stamp Set
- Versafine Onyx Black Ink
Watercolor Flowers with Zig Real Brush Markers
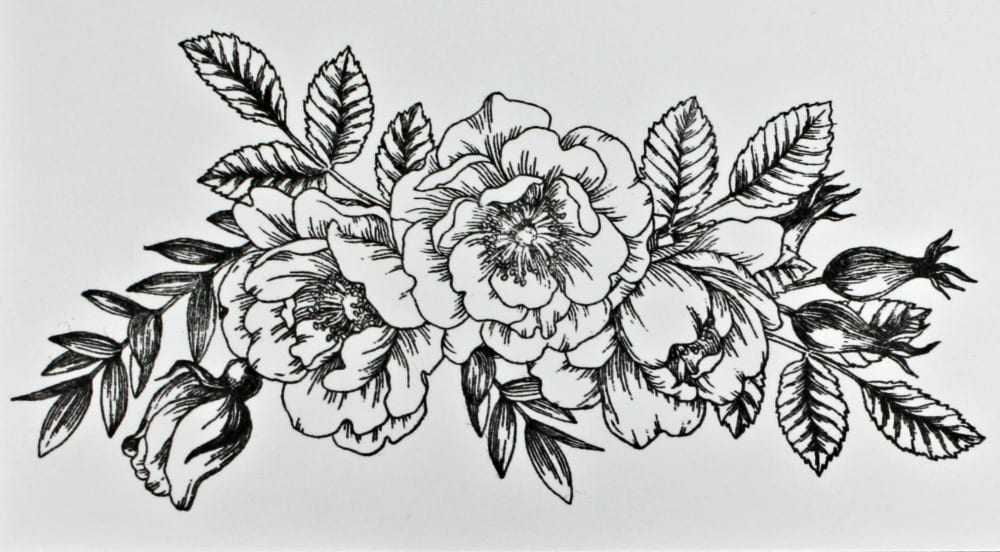
Now I made the mistake of not videoing this card. I was just playing around when I started it and honestly didn’t think I’d end up putting it on a card but such is life. So, I’m going to use some close-up photos and arrows to explain how I did this and got this look that I really really liked.
When you look at an image like this flower, it can be intimidating to figure out how exactly to apply color to it. Just because an image is large don’t let it freak you out. And if you’re looking at this thinking “But what about all those black lines in the flowers…what do I do with those?” You use them! Below is the stamped image on Neenah Solar White so you can see how detailed this stamp really is. Don’t let that scare you!
Painting the Stamped Image
The image is stamped in Versafine Onyx Black Ink. It is a waterproof ink so it’s perfect for watercolor. As noted in the Products Used above, I used Ranger Watercolor Paper. The first thing I did to apply color was to scribble on the Lilac color on all of the flowers except the centers. I used a water brush to make sure the purple color covered all of the petals. I let that layer of color dry. You can use a heat tool to dry it if you want. This wash of color allowed me to create the highlighted portion of the flowers. The light parts have a single layer of watercolor on them.
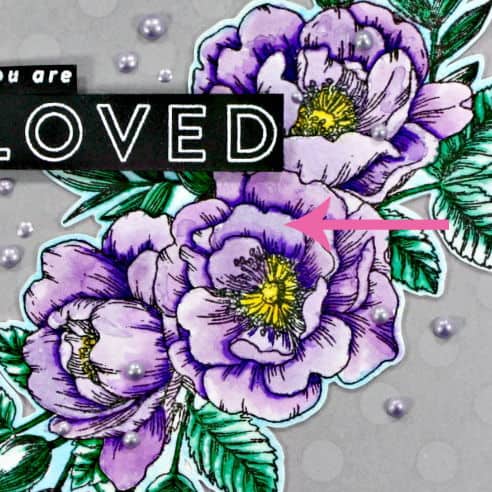
After that layer completely dried, I added the Violet marker in the places where the shadows would be in the flower then took my water brush and blended the line of Violet out. Notice the blend isn’t smooth. This gives the flowers character. After all, flowers aren’t perfect creations.

Once the purple was dry, I added yellow to the centers of each flower. The greenery was simple: a line down the center of each leaf with small lines of green over the veins in the leaf. Then again I pulled the color out with a water brush. After that dried, I added some light blue around the outer edges of the flower image.
Card Front Background and Sentiment
The Beautiful Flowers stamp set not only has beautiful flowers but amazing sentiments as well. I used my anti-static powder tool on black cardstock and stamped ‘you are’ and ‘Loved’ in Versamark Ink. I coated the sentiment in white embossing powder and then melted it with my heat tool.
I looked at adding the flowers to just plain white but it was too stark for me. I really liked the gray cardstock but it still needed a little something so I added a background stamp using Versamark Ink. This just added a little something to the background but let the focus remain on the watercolor flowers.
Embellishments and Pulling It Together
I glued the gray panel to the front of a 4 1/4″ x 5 1/2″ top folding white card base made from 110lb Neenah Solar White cardstock. Then I glued down the watercolor flowers towards the bottom right. I used scissors to trim off the parts of the image that hung over the edges of the card. It didn’t seem like the right thing to add glitter or shimmer to the flowers, I wanted them to stand on their own. But I did want to bridge the gray and purple so I added Wisteria Nuvo Crystal Drops which was perfect! I used foam strips to pop up the sentiments. And done!