Star Light Christmas Card
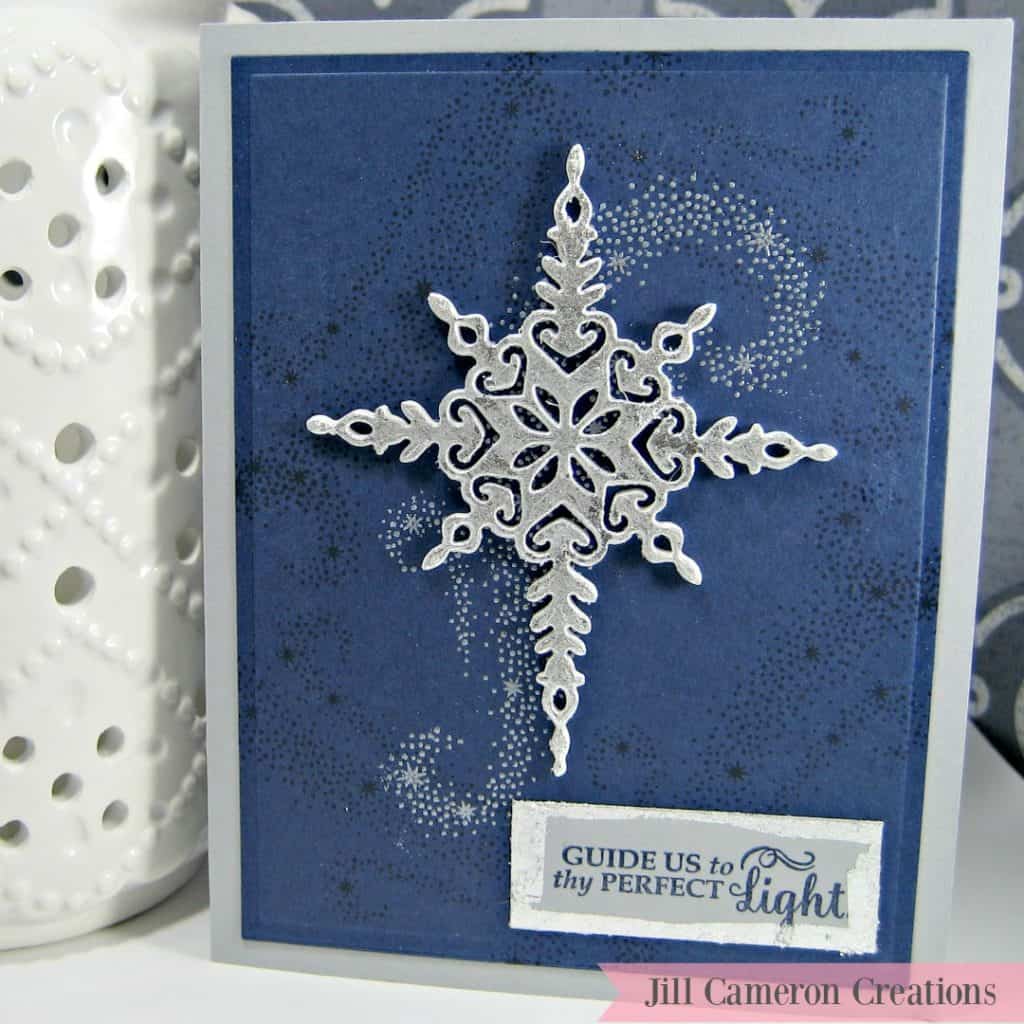
The inspiration for a card can come from anywhere. This card was inspired by my friend Jennifer. She saw the ‘Star Light’ clear stamp and die set from Stampin’ Up! and knew she had to make cards for Christmas with it. She wanted navy, gray, and silver. The Star Light Christmas Card is the culmination of her ideas.
Affiliate Disclosure Policy
This post contains affiliate links for your convenience. This means if you make a purchase after clicking a link, I will get a small commission with no additional cost to you as the consumer. Jill Cameron Creations/Jill Lipscomb participates in the Amazon Services LLC Associates Program, an affiliate advertising program designed to provide a means for sites to earn advertising fees by advertising and linking to Amazon.com. For full disclosure policy click here.
Star Light Christmas Card
Cardbase
The card base is A2 size, side fold card out of light grey cardstock. I cut down a piece of navy cardstock into 4 1/4″ X 5 1/2″ panels. Then, used a die from the Matting Basics A2 size dies by Spellbinders to cut the panel to 3 3/4″ x 5″. I like to use matting dies so my panel has a nice finished edge. Spellbinders dies not only provide the finished edge but also emboss a beautiful frame.
Background Panel
Next, I used the Star of Light Stampin’ Up! clear stamp set to create the background on the navy panel. There’s this beautiful swirl stamp in the set. I stamped it all over the background in a navy ink to create a tone on tone look.
After that, I wanted to create a focal point for the center of the card where the large die cut star is going to be placed. I used an antistatic powder tool on the navy panel to make sure embossing powder wouldn’t stick to anywhere I didn’t want it to stick. I stamped the same swirl of stars image in Versmark then covered it with Silver Pearl Hero Arts Embossing Powder and melted it with my heat tool. This was done twice.
Diecut Star
Once the background was completed I moved onto to creating the diecut star. I covered a piece of white cardstock with a double-sided adhesive sheet. I diecut the detailed star. Then, I removed the release paper from the adhesive sheet on the diecut. I covered it with Nuvo Silver Gilding flakes. You’ll need a small box and an area where there is NO air movement in your craft space to use Gilding Flakes. Super messy stuff but so worth it! The Nuvo Dual Ended Brushes are amazing to buff the Gilding Flakes off of your diecut.
I die cut the same star from a piece of white fun foam and adhered to the back of the silver star. The sentiment was stamped in navy ink on grey cardstock. I put some tape runner around the edges and put some Silver Gilding Flakes around the edges and buffed it smooth.
Lastly, I adhered the navy panel to the front of the grey card base, then the silver star and sentiment. The card looks complex however it is really a simple and fun card.
