Print and Cut Copic Coloring + Save The Crafty YouTuber Video Hop
This is going to be a rather lengthy post so grab a cup of tea or coffee and relax for a few minutes. This post goes along with my video over on YouTube for the Save The Crafty YouTuber Video Hop which is linked below. There are lots of videos and prizes. Justine Hovey is our hostess and she has all of the information over on her blog including the list of hoppers.
As most of my regular readers know I have been working on some major projects lately and one of those projects is creating my own cut files to share with you and to sell. For my cards today I used images and cut files I created myself along with some stamp and ink accents.
I love to find new ways to utilize the products I have and the resources available to me. One of those resources is my Silhouette Cameo 3 and Silhouette Studio. If you don’t know, Silhouette Studio is a powerful editing and creation program that’s not just for opening files. The best part is, it’s so easy to use that anyone can create in Silhouette Studio.
For the Save The Crafty YouTuber Video Hop (man that’s a mouth full), I created two cards. One is the teacups and the other is the coffee cup. These are print and cut files that I Copic colored. Yes, you read that correctly I Copic colored print and cut files! It’s like creating a digital stamp and then a digital die for it. It’s so much fun! My favorite part about this process is I can determine the size of the white border around the image or choose not to have the border at all. Below are the photos of each card.
Print and Cut Copic Coloring
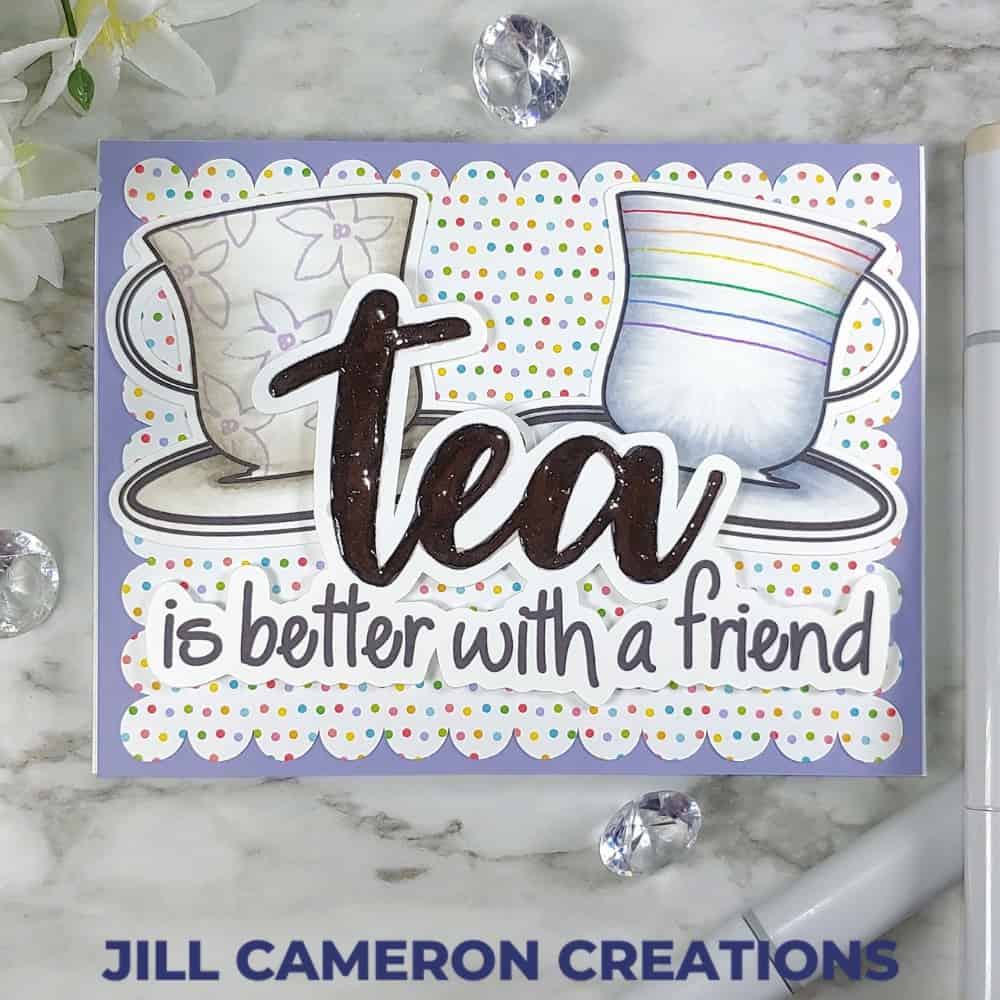

I enjoy Copic coloring and creating with my Silhouette so I decided to marry the two by creating easy to color images with the cut files. The first thing to do is grab the Tea is Better with Friends and But First Coffee SVG files. Subscribe to my newsletter and you’ll also get access to my FREE Resource library with all of my SVG files.
Now, since you are downloading SVG, PNG, and JPG files you’ll need to Trace the image in Silhouette Studio and change the inside lines to “No Cut” in the Send panel.
Next, print the images out on Copic friendly paper on an inkjet printer. DO NOT use a laser printer if you plan on using Copic markers. Toner will ruin the nibs of your Copic markers.
Also, don’t forget to turn on Registration Marks. They are the third tab in the Page Set-up Panel. These marks tell the Silhouette where to cut by relating the position of the marks on the paper to the marks on the screen.
Do not close Silhouette Studio! Leave those files open while you go and color them. That’s a big one. Since you’re going to go back and cut the images and sentiments using your Silhouette, you want the images in exactly the same place on the screen as when it was printed.
Color the images with whatever medium you want to. If you wanted to watercolor these and your printer will print on watercolor paper, then go for it! Just be sure the printer ink is super dry!
Lastly, cut the images out with your Silhouette by placing the full sheet of printed paper on a cutting mat. Make sure the paper is in the top left corner of the mat. Get it as straight and close the lined edge as you possibly can. This will give you the best cut.
The video below shows you how I colored my images.
I finished off each of the cards by adding simple accents and patterned papers. I used my Scalloped Rectangles cut file to create the backdrop for both of the cards. I popped the sentiments up with foam tape. For the teacups card, I added TONS of Clear Aqua Shimmer Pen then covered it in Glossy Accents. For the coffee cup, I added Nuvo Glitter drops in little dots on the coffee cup wrapper.
If you like the look for stacked die cut words, just cut out the words multiple times and stack them up on the shadow to make them pop. You can change the color or just cut them out of different colored cardstock too.

See more Silhouette Projects
Bold Sentiments on Bold Backgrounds
TARDIS Card SVG
Die Cut Inlay Heart Card
