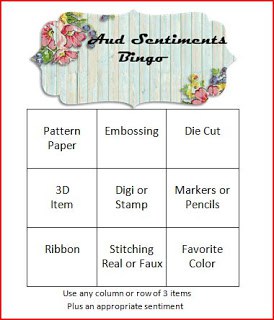
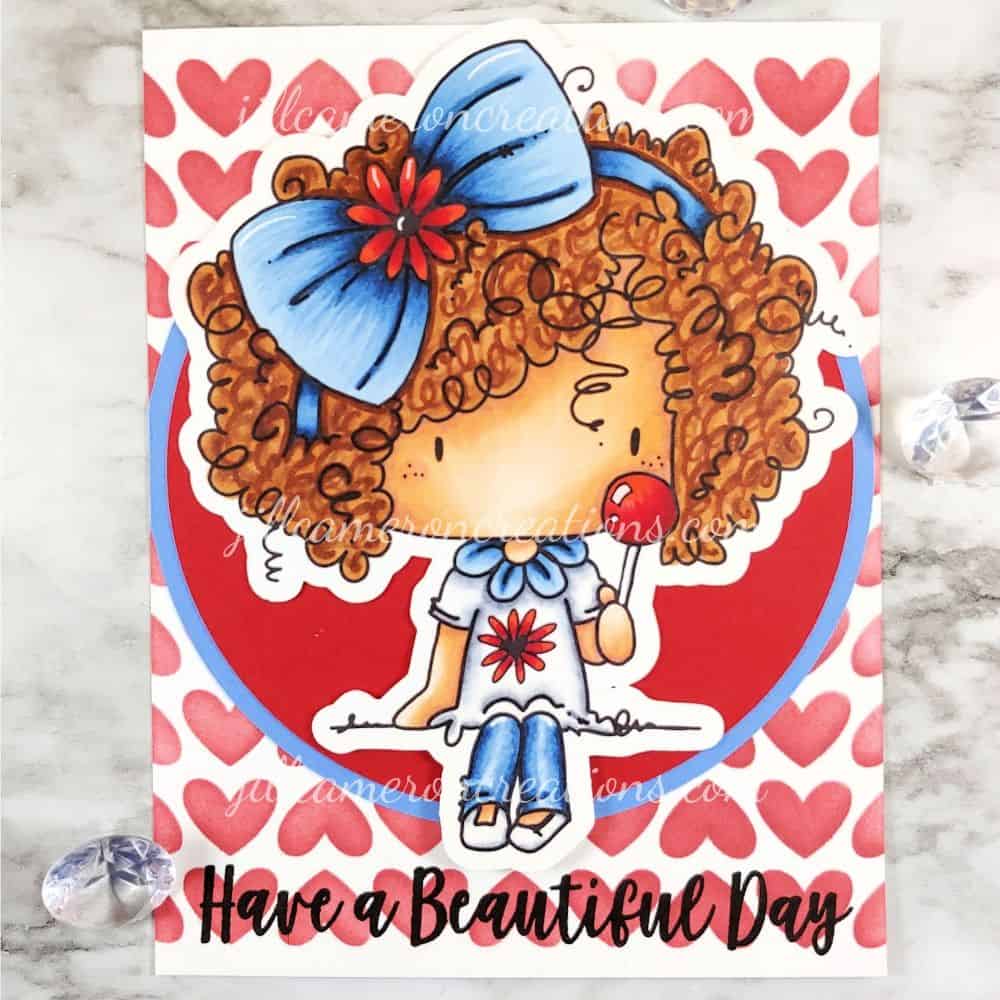
Today, I’m Copic coloring curly hair in an image from Bugaboo Digi Stamps for the Aud Sentiments Challenge 231. As part of the design team, you’ll see my card featured over there as a demonstration of the theme of this challenge. And that challenge in Bingo + a sentiment. Not sure what Bingo mean means? Here’s a visual explanation.
I used the last column: die cut, markers, and favorite color for this challenge along with an image provided by Bugaboo Digi Stamps.
Don’t forget all of the products used in this card are listed at the bottom of this post. Just click the photo of the product to go directly to the online shop.
This post contains affiliate links for your convenience. This means if you make a purchase after clicking a link, I will get a small commission with no additional cost to you as the consumer. I participate in the Amazon Services LLC Associates Program, an affiliate advertising program designed to provide a means for sites to earn advertising fees by advertising and linking to Amazon.com. For full disclosure policy click here.
Copic Coloring Curly Hair
Curly hair is the easiest thing to color. You know how when you color straight hair you follow the direction and flow of the hair so it looks correct? Yeah, with curly hair you don’t have to do that. Think about a person you know with naturally curly hair. Is there anything even about their hair? Nope. Here’s the video below of just how easy this card came together.
Here’s how you color curly hair: squiggles and curly q’s. Not kidding. Here’s a close up of this curly head of hair.

You can see that I used at least four different colors in her hair and you can still see almost all of the individual markers strokes. For curly hair, that’s exactly what you want. Don’t color it as if it were a solid mass of hair. That will end up looking like a football helmet.
I went directly over the artist drawn lines within the hair first. Then I just added squiggles and curly q’s and some large comma marks towards the outside edges.
I did follow the direction of the sections of hair provided my the artist.
What if you want to have curly hair on your stamped image but the image is drawn with straight hair? No problem! Check out Sandy Allnock’s post. She is the QUEEN of changing stamped images!
The rest of the Copic Coloring
I used the same methods I usually use to color the rest of the image. My favorite colors included!
I die cut my Copic colored image using my Silhouette Cameo. This is a very simple process. I print my image from Silhouette Studio with registration marks. That way when I put the paper on my cutting mat I just tell the Cameo to look for those marks and it know exactly where to cut. I’ll do an in depth post on this and show each step of the process. I really like this method because it gives me the same look that a coordinating die would for a stamped image.
For the background, I used a heart stencil from MFT and some new-to-me blending brushes. I’ve seen several videos with the new ink blending brushes like the ones from Picket Fence Studios and Taylored Expressions but to be honest I don’t have the money to spend on them. I did some research and found this set from Amazon that I really like. These are make-up brushes and for this price, I could not like them and be okay with it. But here’s the thing…I REALLY like using these brushes for ink blending! I’m doing a comparison video on ink blending tools soon too! I’ve linked the Picket Fence Studios brushes at the bottom of the post.
I discovered while making this card that I don’t have a really great set of circle dies. I’m going to have to invest in the Hero Arts Nested Circle Dies really soon. I made do by cutting the circles out using my Silhouette.
The sentiment for this card is from a retired stamp set from MFT, but if you’re wondering the name of the set is You Give ME Butterflies.
Well, that is all for today! I hope you give curly hair a try and be sure to share your work in my Facebook Group.
Also, if you’re new to Copic coloring you’ll want to know how to fix your mistakes so take a look at this post.

Very pretty,
Hugz Tinz