How-to: Ink Blend a Background when Using Digital Stamps
Did you know that you can ink blend a background when using digital stamps? It’s just like using regular stamps but a little different. I didn’t even use a mask to ink blend this background. I shied away from using digital stamps for a long time because I thought they were so limiting. Oh, how wrong I was! When I saw the adorbs Toasty Marshmallows from 2 Cute Ink, I knew I wanted an ink blended background for this card. Let’s check out to do this. There’s a video linked below and all of the products used (as mentioned in the video).
Affiliate Disclosure Policy
This post contains affiliate links for your convenience. This means if you make a purchase after clicking a link, I will get a small commission with no additional cost to you as the consumer. Jill Cameron Creations/Jill Lipscomb participates in the Amazon Services LLC Associates Program, an affiliate advertising program designed to provide a means for sites to earn advertising fees by advertising and linking to Amazon.com. For full disclosure policy click here.
How-to: Ink Blend a Background when Using Digital Stamps
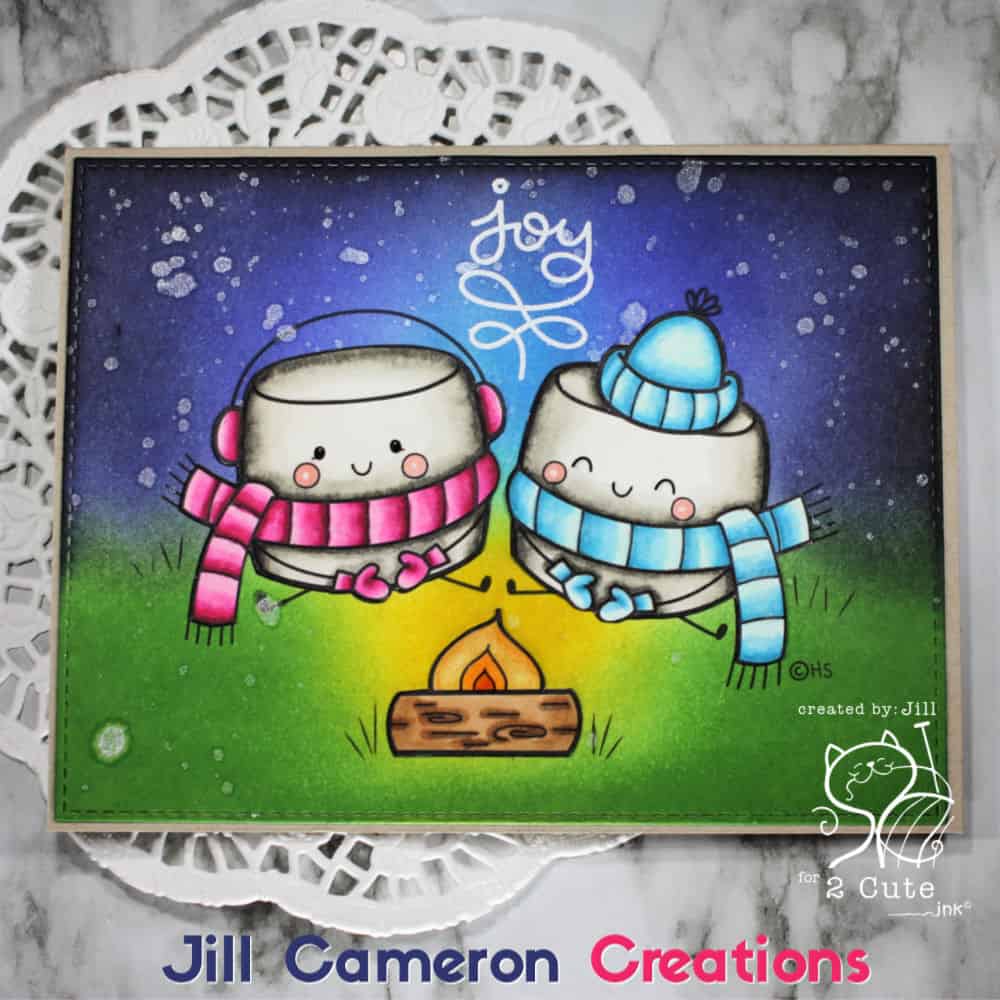
Ink blending a background when using digital stamps isn’t as difficult as it may seem. No masks are required or needed for this method. It’s pretty straightforward.
The very first thing to do is print your image twice. Print the exact same image the exact same size twice. The printer I use is a Canon Pixma iP8720. I don’t use Canon ink. I use generic ink that’s about 1/4 of the price.
Color one of the images in whatever medium you want to. I used my favorite coloring medium which is Copic markers. (P.S. Copic markers are going up in price after the first of the year so if you’re interested in Copic markers, better grab them now!)
Next, trim down the other image to be a card front or whatever size you’d like it to be. I die-cut mine with a large stitched rectangle die.
Now, you can ink blend the entire background without using masks or worrying about messing anything up. Ink blend the background and go right over the digital stamp images.
Cut out the images you colored by hand. Get right up close to the black lines. If there are parts of the digital stamp that are too small to cut, don’t worry about it and just cut them off. Look at the picture of the card I made. The legs, the ends of the scarf, and the earmuff band are all on the background.
Adhere your colored images right over top of the images on the background. Now, you’ve got a beautiful ink blended background using digital stamps.
More information on digital stamps:
Also, if you’ve never used digital stamps check out this tutorial on how to print your digital stamps using Google Docs. And if you’re looking for something a little more challenging to do with your digital stamps, take a look at my tutorial on how to create a background with digital stamps.



I have so many digital pictures and so appreciate you showing me a way to use them with a blended background and just a fun way to use them. Thank you for sharing this technique.
There are so many amazing digital stamps images out there! I love using them just like traditional stamps and sharing techniques with others.