Seas The Day Encouragement Shaker Card
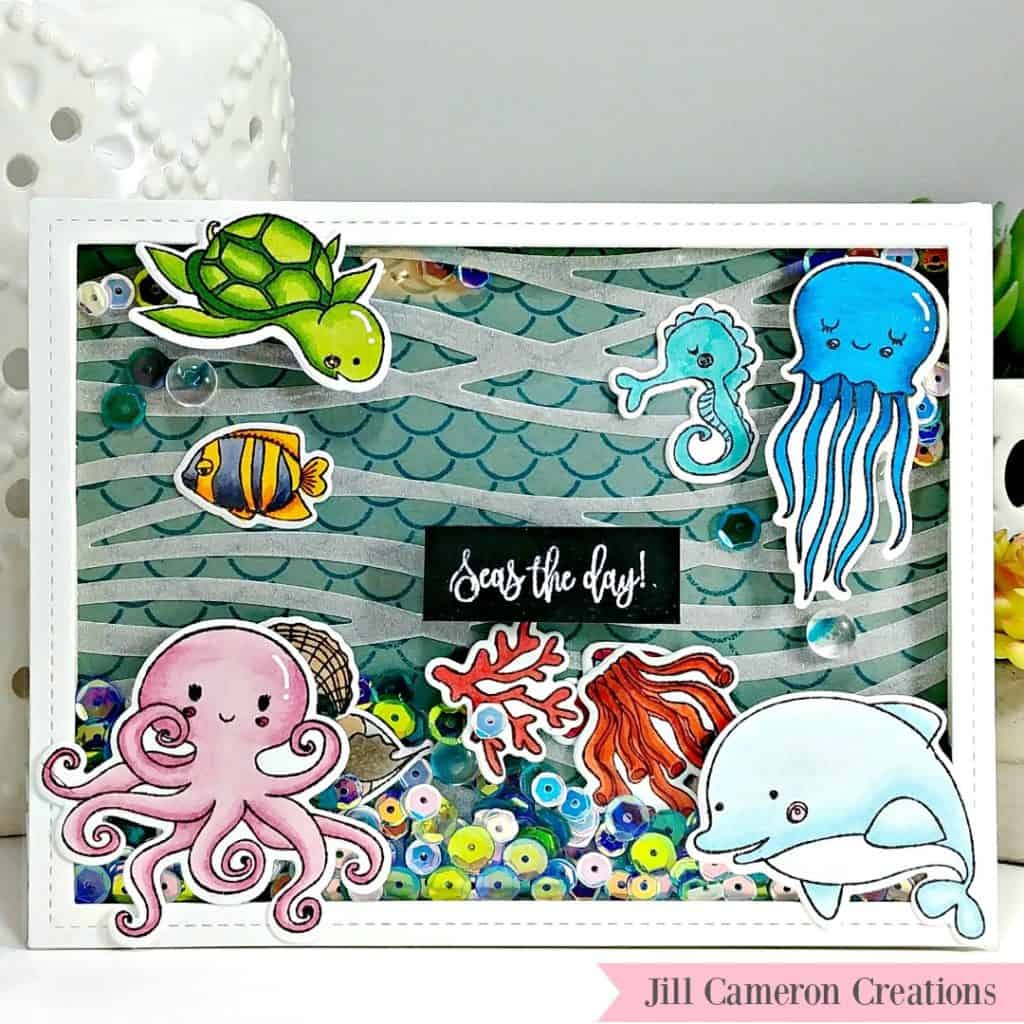
This Seas the Day Encouragement Shaker card was so much fun to make and pretty darn simple to make. While shaker cards aren’t difficult to make, they do take a little bit of time and patience to make sure everything fits together nicely. You wouldn’t want to shake your card and have the insides go flying across the room. My Seas the Day Encouragement Shaker card has several layers and so much dimension!
Affiliate Disclosure Policy
This post contains affiliate links for your convenience. This means if you make a purchase after clicking a link, I will get a small commission with no additional cost to you as the consumer. Jill Cameron Creations/Jill Lipscomb participates in the Amazon Services LLC Associates Program, an affiliate advertising program designed to provide a means for sites to earn advertising fees by advertising and linking to Amazon.com. For full disclosure policy click here.
Seas The Day Encouragement Shaker Card
First, I stamped the background panel. It is a lite pool color. I used the same color of ink with the MFT Stamps Mermaid Tails Background Stamp. Then, I die cut the waves using a die from Stampin’ Up! from pearl vellum.
Next, I stamped all of the images from the Pink & Main Seas the Day stamp set with My Favorite Things Hybrid Black Licorice Ink on Neenah Solar White #80 cardstock. I colored all of the images using Copic markers and added some highlights with a white gel pen. Pink & Main has a coordinating die set which I used to cut out all of the images.
When you build a shaker card, you need an opening for the window. I used the Lawn Fawn Lawn Cuts Stitched Rectangles to create the frame for the window. You’ll need a piece of acetate to go on the back of the frame. Be sure to use SUPER strong adhesive between the acetate and the frame. I prefer to use Scor-Tape instead of liquid adhesives. Next, I added thin strips of foam tape all the way around the back of the frame to add space between the acetate sheet and the back of the card.
Before I put the card together, I adhered some of the smaller images I colored to the background. The easiest way to get all of the stuff in your shaker is to pile it all up in the middle of your background then adhere the front of the card squarely on the background.
Lastly, I adhered the remaining images to the front of the card along with the sentiment and adhered the shaker to the card base.
Then…shake shake shake!!!
One Comment
Comments are closed.